


Cultivation
Growing Weed for Dummies: 10 Simple Steps to Get You Started
Growing Weed For Dummies
You’ve probably fantasized what it would be like to have an entire field of weed all to yourself. Well, why not make the fantasy come true? Growing weed is, after all, kind of like the Holy Grail of the cannabis world. The 10 simple steps for growing weed below will walk you through the basics for growing your very own marijuana plant right at home.
Step 1: Get Some Killer Seed

The right seed produces the right weed. There are a sh•t ton of strains and hybrids out there for you to mess around with, so as you become a more experienced grower try experimenting with different seeds.
To get you started, though, it’s probably easiest to order from an online vendor. Browse their sites to see what sounds good to you and put in your order.
Step 2: Find the Best Growing Container

As soon as your little package of marijuana seeds show up at your house, it’s time to get those little ladies a home.
When it comes to picking out the right container for growing weed, start with something about the same size as a 5-gallon bucket and be sure it has plenty of drainage holes.
Go with either a deep gardening pot, a fabric pot, or a sturdy bucket with holes drilled into the bottom.
The key thing here is that you don’t want your plant sitting in a bunch of soggy, undrained soil—this could damage your plant’s roots or lead to mold.
Step 3: Use an Awesome Soil Mix

The easiest growing medium for beginning cannabis growers is a good, organic potting soil mix.
Look for soil that’s got a good mixture of nutrients, things like coco fiber, compost, earthworm castings, bat guano, peat moss, and kelp meal.
But stay away from anything with “extended” or “slow release” nutrients since these additives can throw off the plant in its flowering stage.
Step 4: Sprout the Cannabis Seed

All right, now that the prep work is done, it’s time to plant that seed. Gently plant the seed 1/2-1 inch deep. Water it until the soil is thoroughly moist and put it in a warm place.
Step 5: Water Your Baby Sprout
It’s important to not let your baby sprout dry out. Keep it moist by gently watering it with a spray bottle. The first leaves your sprout will put out will be rounded and won’t look like marijuana leaves. That’s OK, it’s the first step in your new baby’s life. Give it some time, and soon it’ll put out its first, tiny recognizable marijuana leaves.
Step 6: Let There Be Light

By the time your baby has put out its first recognizable leaves, it’s time to start focusing on light. In a lot of ways, light management is the most important aspect of cannabis cultivation, so try your to get your weed growing brain to focus here. You need to provide your little pot plant with at least 18 hours of light a day.
This means you’ll most likely need to use a fluorescent lamp to be sure your plant gets all the light it needs.
As long as the plant gets 18 or more hours of light in a day, it will think it’s in the “vegetation” phase, which means it will put all its energy into establishing roots and growing itself into a big, bushy, strong, and healthy plant.
It won’t bud for a few more months, but if you’re patient during the vegetation phase and you give it all the light it wants. Your plant will reward you with some serious bud production later on.
Step 7: Feed Your Plant

Throughout the cannabis plant’s growing phase, you should feed it with some high-quality fertilizer. There are a bunch of things you can use to feed your little plant, but the simplest thing to do is get some plant food that’s been specially formulated for the specific needs of cannabis plants.
You can also check out this page for a bunch of other ideas on what to feed your weed plant including wood ash, compost, vinegar and baking soda, even your piss.
Step 8: Give Your Plant Some Loving

The vegetation phase is the longest and most important aspect of a cannabis plant’s life, so be sure you’re giving it some tender loving care while it’s growing up.
Here are the keys:
- After you water the plant, wait until the top inch of soil is dry before watering it again.
- Be sure your plant is kept at a comfortable temperature: 70-85° F (20-30°C) is ideal.
- Keep an eye out for mold, spots, disease, or fungus and carefully remove any damaged leaves.
- Follow fertilizer directions to maintain healthy soil and encourage strong growth.
- Keep those lights on.
Step 9: Trigger the Flowering Cycle

Once your plant has grown to the size you want it to, it’s time to trigger the flowering cycle. You do this by cutting back on the amount of light it gets.
When you’re ready to make your plant start to flower, it’s time to start giving your plant a longer “night,” somewhere around 12 hours of darkness a day should do the trick.
To keep it simple, stick with a 12/12 pattern to induce intense flowering—12 hours of light, 12 hours of dark.
Step 10: Harvest, Dry, & Cure

At this point of the growing weed process, things are getting exciting. You’re almost there, so stick with the directions just a little bit longer.
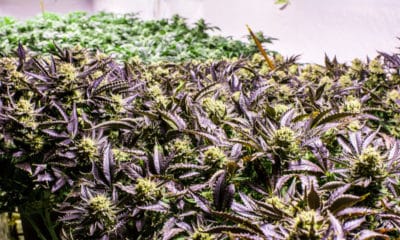
When your plant has produced its buds, it’s time to harvest! Cut the buds away from the plant and remove any large stems or leaves.
Find somewhere where you can hang the buds to dry for a few days.
A few times a day, check how dry the buds are getting, and as soon as the smaller stems start snapping and only the thicker stems are bendable, it’s time to move on to the curing stage.
To cure your weed, which experts will all tell you is key to getting the best flavor and the most potency out of your herb—simply place all those dried buds into glass Mason jars and screw on the lids.
Keep the jars in a dark place and check their moisture content every once in a while. If it’s too moist, let it air out a bit, until the buds are nice and perfectly sticky.

You’ve finished growing weed; now it’s time to celebrate your harvest. Those little seeds you planted 4 months ago have now sprouted, grown, flowered, and it’s time to sit back and enjoy the fruits of your labor. Light one up and get ready for your next round of planting.
For a little inspiration, check out this insane time-lapse video of growing weed clear through to final bud production:
https://www.youtube.com/watch?v=nKSnjGtHLRA


